
DRAWING THE LINE – PART 4
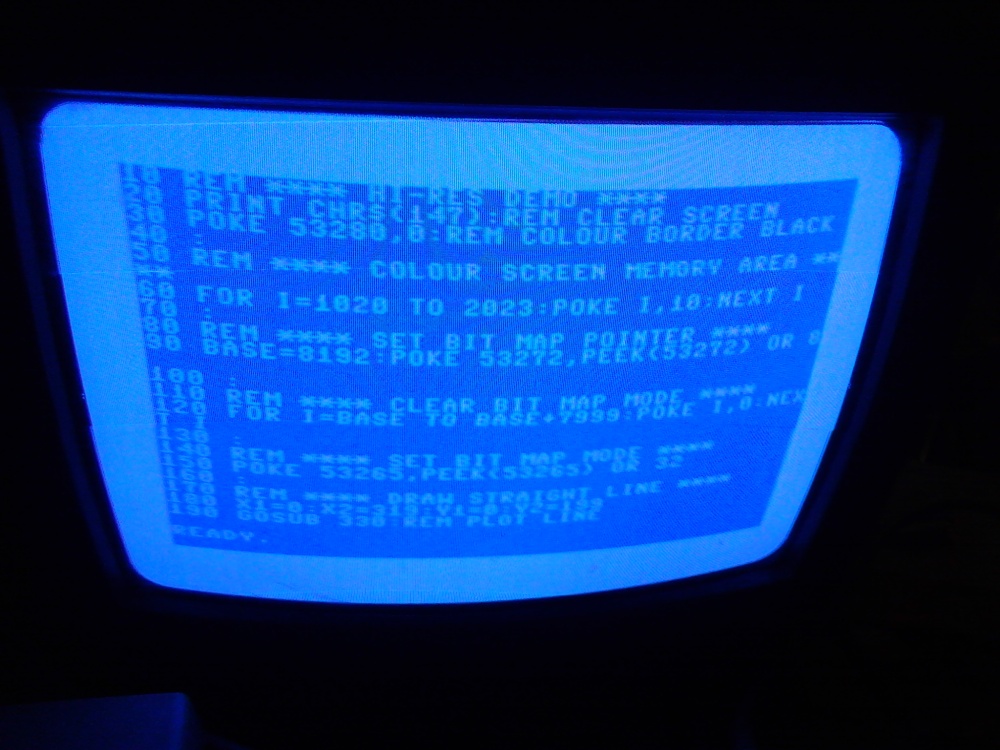
The first screen of this program
In this post, I finally manage to reach what you might call “The Holy Grail” of actually drawing lines from one corner to the opposite corner of the C64 hires graphics screen! There has been a long interval since the previous post https://commodore64crap.wordpress.com/2013/10/18/drawing-the-line-part-3/ in this series. This is because I couldn’t work out how to do it for myself, so the program shown here has been adapted from a listing in the “Home Computer Advanced Course”, which I found in a private club library. I was amazed that it even contained some games type ins in the language Commodore LOGO. You won’t be able to find it at your local public library. Of course, you may be able to find it online somewhere. At time of writing, one or two issues were available on http://www.archive.org
I’m actually typing this in a public library, so this will probably affect the quality of my post. I have had to rewrite this post from scratch after losing my original copy and I haven’t got the Commodore 128 with me at the moment to double check on everything.
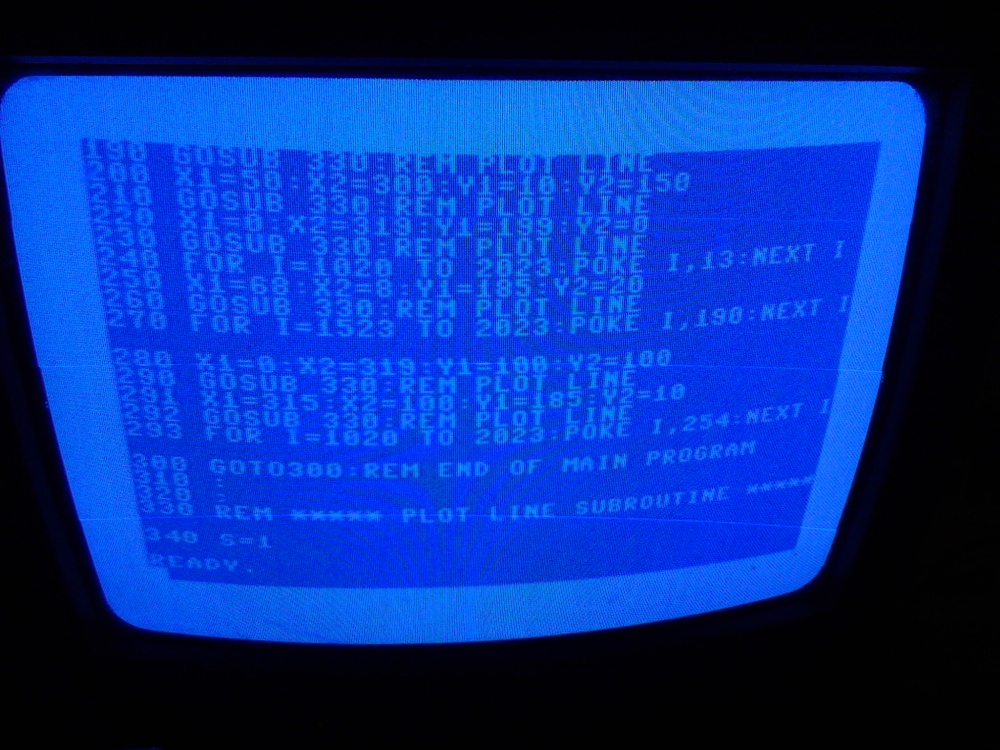
The second screen of this program
Of course, the point of this is to create graphics by programming, not just by using a graphics editor package. This is for a few different reasons…
• Almost every other computer already on sale when the C64 came out could do this easily
• To save RAM
• Not many people buying the Commodore 64 in the early days would have known it wasn’t straightforward doing this
• There were lots of books available exploring how to program graphics on the Commodore 64, indicating that there was a demand for it
• If you can understand how to do this, then it could lead you to do anything at all on computers
Unfortunately, due to the total disruption caused to my life by an evil property developer who evicted me, and me being blocked by evil landlords from finding anywhere else to live, I posted the video featuring the Commodore BASIC V2 program which draws these lines accompanying my last post, but now I’ll repost it here and I’m going to explain to you in great detail how this program works. Just before making the video, I found that about 9 times out of 10 the Commodore 128 I used for this wouldn’t display a picture on the screen when I turned it on. This led me to believe that particular C128 was on its last legs, or at least required some expert repair.
Drawing diagonal lines on the C64 using Commodore BASIC V2
Meanwhile, my opponent TMR, of the rival blog “C64 Crap Debunk” has been posting demos on other computers, even for the Atari 8 bit range in https://c64crapdebunk.wordpress.com/2016/01/29/release-notes-clone-stars/ and other recent posts. Obviously, he’s totally lost the plot, because my blog is all about “Why the Commodore 64’s BASIC V2 was crap and how some people managed to program the Commodore 64”, which was updated from the original “Why the Commodore 64’s 30th Anniversary is Nothing To Celebrate”. Obviously, making posts about existing Atari 8 bit demos, as well as how to program a new version of these demos from scratch in 6502 Machine Code/Assembly Language has absolutely nothing at all to do with the Commodore 64 being crap or not. All it shows is that the Atari 8 bit computers are amazing, with a lot more than 16 colours, but not how people managed to learn programming on the Atari 8 bit computers. The way that people would have learnt to program on Atari 8 bit computers is by starting out programming in a high level language, probably the standard Atari BASIC, which was usually supplied with those computers and was considered to be the standard programming language for them. Atari BASIC was supplied on a cartridge included with the Atari 400 and 800 computers, although it was possible to buy an Atari 400 without this cartridge. Later on, Atari BASIC was built in on ROM in the Atari XL and XE ranges of computer. This is totally different from C64 owners buying an extended BASIC on cartridge, because that BASIC wasn’t the standard BASIC for the C64 and wasn’t featured in many books or magazine type ins.
I now need to give you a breakdown of how this Commodore BASIC V2 program for drawing diagonal lines actually works.
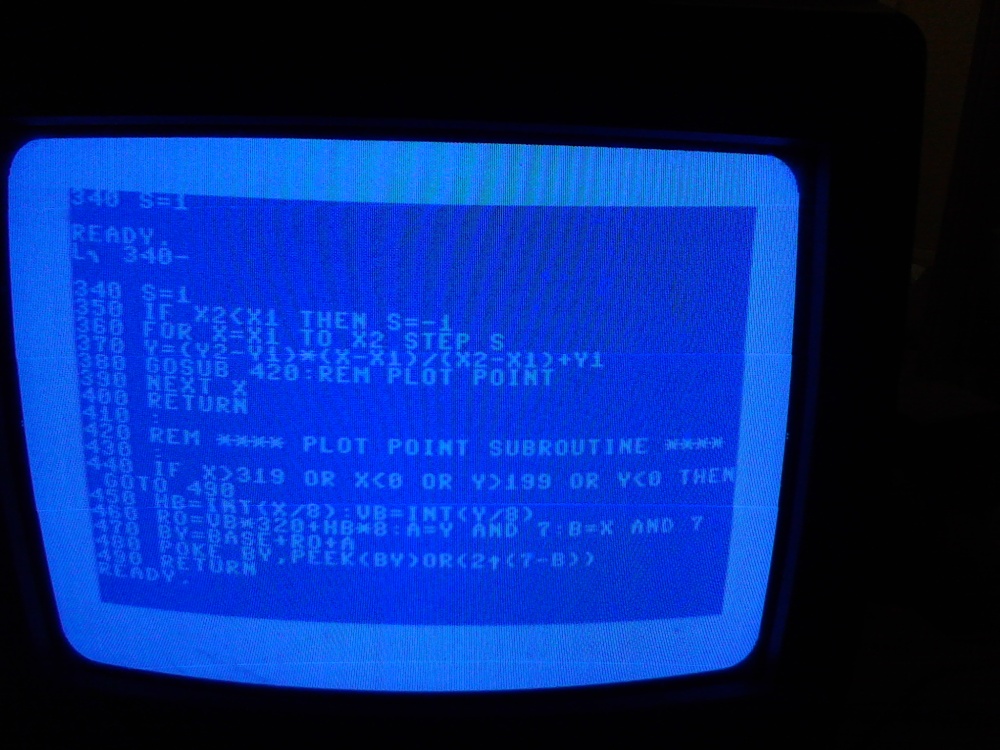
The third and final screen of this program
Lines 10-40 clears text screen, sets border to black
Lines 50-70 sets screen colour memory
Lines 80-100 puts graphics screen at location decimal 8192/$2000
Lines 110-130 clears graphics screen
Lines 140-160 turns on graphics screen
Lines 170-190 draw line specifying X and Y cartesian coordinates (i.e. a screen made up of numbered points on a grid) as start and finish points, as well as GOSUB 330 to achieve this
Lines 200-210 draw another line using same techniques as in lines 170-190, but with different coordinates
Lines 220-230 draw another line using same techniques as in lines 170-190, but with different coordinates
Line 240 changes part of the screen colour memory
Lines 250-260 draw another line using same techniques as in lines 170-190, but with different coordinates
Line 270 changes part of the screen colour memory
Lines 280-290 draw another line using same techniques as in lines 170-190, but with different coordinates
Lines 291-292 draw another line using same techniques as in lines 170-190, but with different coordinates
Line 293 change the whole of the screen colour memory
Line 300 is just a loop GOTO 300, marking the end of the main program, followed by the subroutines
Lines 310-400 plot line subroutine
Lines 410-490 plot point subroutine
The most important part of this program is how it plots points and draws lines. The draw line subroutine is dependent on the plot point subroutine, so let’s look at the plot point subroutine first. This contains some kind of description that the C64 hires graphics screen is 320×200 pixels, divided into character cells of 8×8 pixels, it can display only 16 colours, but only two of those colours can be contained in each 8×8 character cell, one as foreground and one as background colour. This is the way it was designed, regardless of any tricks done by demo makers and games designers years later. The whole thing is done by some mathematical equations, including division and multiplication. So there you go! How could people who aren’t good at maths make up equations or formulae like these? The answer is that they couldn’t, so f**k you Jack Tramiel!!!! The relevant equations are in lines 440-480 and are as follows…
440 IF X>319 OR X199 OR Y
The line above is fairly simple, checking the X and Y coordinates are actually on the C64 graphics screen, then branching to a RETURN on line 490 if they’re not. Now follows the really mind blowing, miserly crap to save paying Microsoft a fee of US$3, US$5, or perhaps even US$10 per Commodore 64 sold…
450 HB=INT(X/8):VB=INT(Y/8)
I think what the line above means is as follows, but I’m not sure. The line seems to be calculating which 8×8 pixel character cell on the C64 hires screen of 320×200 the X and Y coordinates fall into, by dividing each of them by 8. These results are then stored into the variables HB (Horizontal Byte?) and VB (Vertical Byte?). Don’t forget that in the meantime owners of Acorn, Apple, Atari, Dragon, MSX, Sinclair, Tandy, and even less popular computers such as Camputers Lynx, Colour Genie, Memotech and early Japanese computers were having a whale of a time with commands such as PLOT(X,Y), and PSET(X,Y), which could even be placed inside some FOR…NEXT loops to draw lines if no specific line drawing command was available.
460 RO=VB*320+HB*8:A=Y AND 7:B=X AND 7
The line above is somehow calculating either which row in an 8×8 character cell the pixel to be plotted lies in, or which actual line on the screen the point is in. Unfortunately, I don’t understand which one of these things it’s doing or why, because I’m useless at maths. Having calculated in the previous line 450 that VB is an integer arrived at by dividing Y by 8, why would you then want to multiply it by 320?! As for the AND commands working on the variables A and B which follow later in line 460, these are even more obscure and the meaning of the variables A and B hasn’t yet been revealed either! A lot of people out there are probably thinking now that I should shut up and be satisfied creating artwork or music which they could use in a C64 demo, then be grateful to see my name mentioned in some demos as having created the graphics or the music, but I refuse to do this!
470 BY=BASE+RO+A
In the line 470 above, we start to see the new variable A being used with another new variable BY, as well as RO standing for row, but it’s not yet clear what this is doing.
480 POKE BY,PEEK(BY)OR(2^(7-B))
After all the previous work setting up, it’s line 480 above, which actually plots a point! It does this by the familiar mind blowing C64 technique of using POKE and PEEK referring to the same memory location, but one of these is RAM while the other is ROM or a VIC-II graphics chip register. After this, it performs a brain burning OR calculation to somehow work out which pixel to turn on, as well as raising it to the power of two, with a bracketed 7-B to fit in with the rules of precedence, meaning which calculations will be performed in what order. You can copy it, like I did, and it works. Apart from this, I have no real idea how it works, because I’m not good at maths! My response to this is that where LT=Leonard Tramiel…
485 POKE LT,PEEK(LT) OR 85
I hope this makes Leonard Tramiel’s body phase out, like “The Traveler” in Star Trek: The Next Generation Season 1 Episode “Where No One Has Gone Before”, but I hope he stays like that!
ST:TNG “Where No One Has Gone Before”
As for the line drawing routine, this is in lines 310-400. Lines 310 and 320 consist only of semicolons to space out and neaten up the Commodore BASIC V2 program a bit. Line 330 is just a REM statement pointing out that this is the line drawing subroutine. Line 340 sets the variable S to 1, using S=1. What this means in this subroutine is whether or not the start coordinate for a line is less than or greater than the end coordinate, indicating which direction it’s heading in.
350 IF X2<X1 THEN S=-1
Line 350 above checks to see if the end of line coordinate X2 is less than the start of line coodinate X1, then resets S to –1 if this condition is found, so that STEP=-1.
360 FOR X=X1 TO X2 STEP S
This increases or decreases the value of X used in drawing a line.
370 Y=(Y2-Y1)*(X-X1)/(X2-X1)+Y1
It would make sense if line 370 above said something like the value of Y varies, but can be found by calculating if Y2 is less than Y1, in which case go up the screen, otherwise go down the screen, while checking the value of X to get the horizontal position. I think this is what it means, but there’s no way I can explain how it means that, or write a similar routine, I can only copy a routine that works. This is because I’m not good at maths. If a nasty maths teacher like “Mr Wells” had said something to me in a classroom such as “Isn’t THAT it, laddie?” or “Now do you understand?”, or “I hope you’ve got it now”, then I would immediately have said “Yes”, “Oh, I SEE!”, or “Yes, I understand now”, so that I wouldn’t have had to stay in for half an hour after class staring at a page of problems. After that, I would’ve gone home and got my Dad to explain it to me, before forgetting how to do it a few weeks or months later, after this knowledge was deleted from my brain by some later maths techniques I was forced to study.
380 GOSUB 420:REM PLOT POINT
After all the complicated calculations, line 380 passes the results to the plot point subroutine at line 420.
390 NEXT X
Line 390 does it all again for the next pixel in the line.
What happens earlier on in the program before these two subroutines is more straightforward. I think we’ve already been over it all in previous installments of this series, but I’ll go over it all the same.
Line 10 is just a REM statement, while line 20 just clears the text screen with a PRINT CHR$(147) command. Line 30 just uses one of the notorious POKE commands, in this case one of the first two POKEs any C64 owner would have learnt, namely POKE 53280 to set the border colour. In this case it’s POKE 53280,0 , which turns the border black. Line 40 only contains a semicolon to neaten the program listing up.
Line 50 is just a REM statement saying “COLOUR SCREEN MEMORY AREA”, while line 60 does the job of filling the whole of colour memory with the same colour using a FOR…NEXT loop. This goes as follows…
60 FOR I=1020 TO 2023:POKE I,10:NEXT I
Line 70 is another line containing just a semicolon to break up the program a bit.
Line 80 is another REM statement, saying “SET BIT MAP POINTER”, meaning locate the hires screen at location 8192/$2000. The location seems to be the only one available to place the graphics screen at when using Commodore BASIC V2. This is done by line 90 as follows…
90 BASE=8192:POKE 53272,PEEK(53272) OR 8
Next, after another lone semicolon in line 100, it’s time to clear the bitmap of Commodore generated garbage, pointing this out with another REM statement in line 110 saying “CLEAR BIT MAP MODE”, then the real working of clearing the hires graphics screen is done as follows…
120 FOR I=BASE TO BASE+7999:POKE I,0:NEXT I
Lines 130-160 set the bit map mode, meaning turn on the graphics screen. Lines 130 and 160 only contain a single semicolon each to neaten up the listing. LIne 140 is a REM statement saying “SET BIT MAP MODE”, while line 150 does the actual work, reading as follows…
150 POKE 53265,PEEK(53265) OR 32
This sets one of the registers on the VIC-II graphics chip.
LINES 170-300 contain lots of values for the lines coordinates to draw several lines. Before a line can be drawn, the variables X1, X2, Y1, and Y2 must be assigned values, then this is always followed by a GOSUB 330. A few times during this section of the program, you’ll see lines containing commands such as FOR I=1020 TO 2023:POKE I,N:NEXT I. In these lines, N is actually a specific number, not a variable, and this changes the screen colour memory on a character cell by character cell basis, sometimes just for part of the screen, by specifying different start locations from 1020 or different end locations from 2023. I tried using this technique to change the colours of the whole of the line from the top left hand corner to the bottom left hand corner, but I found that I couldn’t get the changed colours to follow the whole line, only on a character cell by character cell basis. I assume that to get the effect I wanted, I would’ve had to adapt the mathematical equations listed above. As I don’t understand how they work, because I’m no good at maths, this means I can’t do that. There are 256 colour combinations, due to having 16 foreground colours and 16 background colours, and 16×16=256, although some of these would appear to be invisible. I’m not sure how many of the combinations would be invisible, because I’m useless at maths, but I’ll make a guess that it would be 16.
More bad news! I packed as much stuff into suitcases and a rucksack as possible before the Bailiffs turned up to evict me. My plan, agreed with the evil property developer, was to return within the next week to pick up as much of the other stuff as possible. Unfortunately, when I turned up to collect some more stuff, I found that builders working there had piled all my stuff into one room and buried it under furniture, rubbish, etc. This meant I could hardly see any individual items to grab and remove from the flat. Due to this, I lost my Commodore 128, all 3 Atari 8 bit computers, 3 electric guitars, a music keyboard, all commercial DVDs, all printed books, etc, etc. It was a total disaster! I don’t know if or when I’ll have another rented home of my own, or be able to buy another Commodore 128 to carry on producing examples of how to program a Commodore 64. I don’t want to buy an actual Commodore 64 and programming on an emulator just doesn’t feel right.
That’s all for now! In the near future I plan to do another post in the series “Oh That Would Be VERY Difficult!”
